Just a tad bit of canning going on
This weekend we have a lot that will be going on in our kitchen!
Now, I have to say, while I thoroughly enjoy shows like Masterchef, I am no where near as talented as the home chefs on that show.
I do best following a recipe, tweeking it a bit, maybe adding a flavor or two and staying with that. I know what flavors go well together and I know what flavors don't.
Ask me on any given day what ingredients are used in, oh I don't know, a flan, and I'll remark that I love flan but wait, let me look up the ingredient list and directions first.
With that all said, I'm going to post the following recipes and provide the links so that I may give full credit to the cook who created the recipe. This way I can kill the proverbial two birds with one stone. You can see what I'm doing with natures bounty and I can go back two to three years from now and figure out which recipes I really loved and which ones not so much.
Makes 4 half-pints
Place tomatoes, vinegar, lemon juice, lemon zest, garlic, shallots, red chili flakes and salt in a 6- to 8-quart, heavy-bottom sauce pot. Add the pectin and stir in.
Place over high heat and bring to a FULL ROLLING BOIL (a boil you can’t stir down), stirring constantly to prevent scorching. (If mixture starts to scorch, turn down heat a bit.) Stir in the sugar and, as soon as the full rolling boil takes place again, start timing and cook jam for 6 minutes.
Then remove from heat, stir in basil and fill jars as above. Process jars in boiling water bath for 15 minutes (with this method jam will keep for up to 1 year stored at room temperature), or cool and refrigerate jam for up to 3 months.
Copyright 2009 by Kathy Casey.
I can say this, this is absolutely delicious! Sweet, savory with a tad bite of spice from the chili flakes at the end. I can imagine it going great with a cracker smeared with a tad bit of chevre or if you are like Edward and you do not like chevre, a nice slice of feta would do the trick too. I like this much, much better than hot pepper jelly!
 Makes 4-5 half-pints
1/2 cup slivered almonds
Makes 4-5 half-pints
1/2 cup slivered almonds
12 ounces Granny Smith apples (about 2 large)
4 pounds peaches, peeled, pitted and diced
11/2 cups granulated sugar
3 tablespoons strained fresh lemon juice
2 teaspoons fresh lemon thyme leaves (or 1 teaspoon regular thyme)
3. Quarter and core the apples, reserving the cores and seeds. Tie apple trimmings in cheesecloth (or a jelly bag, if you have one).
4. Put the peaches and sugar in a wide, 6- to 8-quart preserving pan or other wide, shallow pan. Bring to a simmer over medium-high heat, stirring frequently, and continue to cook until the juices just cover the peaches, about 5 minutes. Pour into a colander set over a large bowl. Stir peaches gently to drain off juice. Return juice to pan, along with the apples and the trimmings. Bring to a boil over high heat and cook, stirring occasionally, until syrup is thick and reduced, about 15 minutes.
5. Return peaches and any accumulated juices to pan. Add lemon juice, almonds
and lemon thyme. Bring back to simmer and cook, stirring frequently, about 15 minutes, until peaches are very tender and a small dab of jam spooned onto the chilled plate and returned to the freezer for a minute becomes somewhat firm. (It will not gel.) Remove from heat. Discard apples and trimmings, and stir gently to distribute fruit in the liquid.
6. Ladle hot jam into the jars, leaving 1/4-inch space at the top. Wipe jar rims. Put a flat lid and ring on each jar, and tighten until snug. Return the jars to the canning pot, making sure water covers jars by at least 1 inch. Bring to a boil and boil for 5 minutes. Remove from pot and let sit untouched for 12 hours. (After 1 hour, check to see if the jars have sealed. If the center of the lid can be pushed down, it hasn't sealed. Store any unsealed jars in the refrigerator.) Label and store, preferably in a cool, dark place.
1 quart whole milk
1 1/2 cup buttermilk
1 to 2 teaspoons sea salt
Cheesecloth
Colander
Heat up the milk, the buttermilk and the sea salt until around 180 to 210 degrees. Make sure to GENTLY heat this as you do not want the milk to scald on the bottom of the pan.
I stir it in the beginning to make sure the buttermilk and salt is fully incorporated and then I leave it alone.
This is the best advice I can give when making buttermilk cheese. Really, leave it alone. Do not stir it. Just turn it on, make sure it's not getting too hot too quick and then walk away and go fold laundry or something else.
Come back shortly thereafter and VOILA! Your curds and whey will now have seperated. Turn off heat and allow it to cool a bit. Around 10 minutes or so.
Now slowly empty pot of whey and curds into the cheesecloth that you have placed into the colander.
At this point I just let the whey drip out for about 10 minutes. After this freely dripped for a while, I gathered up the cheese cloth and tightened the top a bit and began to exert some pressure on the curds.
This accomplishes two things. You drain more whey out and you force the curds to form together.
Now here's where the real fun begins!
You can add whatever spices you feel like adding! My most recent batch was Lemon Pepper using a plain old lemon pepper sea salt mixturre and the other one I flavored with garlic salt.
The possibilities are truly endless!
Recently Edward and I made enchiladas and I used the garlic flavored cheese as part of the filling. Oh my was it delicious!
Now, I have to say, while I thoroughly enjoy shows like Masterchef, I am no where near as talented as the home chefs on that show.
I do best following a recipe, tweeking it a bit, maybe adding a flavor or two and staying with that. I know what flavors go well together and I know what flavors don't.
Ask me on any given day what ingredients are used in, oh I don't know, a flan, and I'll remark that I love flan but wait, let me look up the ingredient list and directions first.
With that all said, I'm going to post the following recipes and provide the links so that I may give full credit to the cook who created the recipe. This way I can kill the proverbial two birds with one stone. You can see what I'm doing with natures bounty and I can go back two to three years from now and figure out which recipes I really loved and which ones not so much.

Makes 4 half-pints
- 3 cups peeled and chopped tomatoes, about 1 1/2 pounds
- 3 tablespoons balsamic vinegar
- 1/4 cup fresh lemon juice
- 1 tablespoon finely minced lemon zest
- 2 teaspoons finely minced garlic
- 2 shallots, minced
- 1/4 teaspoon crushed red chili flakes
- 1 teaspoon salt
- 1 box MCP pectin
- 3 cups sugar
- 2 tablespoons finely chopped fresh basil (we used a mixture of traditional sweet basil and Thai basil)
Place tomatoes, vinegar, lemon juice, lemon zest, garlic, shallots, red chili flakes and salt in a 6- to 8-quart, heavy-bottom sauce pot. Add the pectin and stir in.
Place over high heat and bring to a FULL ROLLING BOIL (a boil you can’t stir down), stirring constantly to prevent scorching. (If mixture starts to scorch, turn down heat a bit.) Stir in the sugar and, as soon as the full rolling boil takes place again, start timing and cook jam for 6 minutes.
Then remove from heat, stir in basil and fill jars as above. Process jars in boiling water bath for 15 minutes (with this method jam will keep for up to 1 year stored at room temperature), or cool and refrigerate jam for up to 3 months.
Copyright 2009 by Kathy Casey.
I can say this, this is absolutely delicious! Sweet, savory with a tad bite of spice from the chili flakes at the end. I can imagine it going great with a cracker smeared with a tad bit of chevre or if you are like Edward and you do not like chevre, a nice slice of feta would do the trick too. I like this much, much better than hot pepper jelly!

12 ounces Granny Smith apples (about 2 large)
4 pounds peaches, peeled, pitted and diced
11/2 cups granulated sugar
3 tablespoons strained fresh lemon juice
2 teaspoons fresh lemon thyme leaves (or 1 teaspoon regular thyme)
1. Sterilize jars by boiling for 10 minutes in a large canning pot; leave them in the pot to stay hot. Put a small plate in the freezer. Put the flat lids in a heatproof bowl.
2. Toast almonds in a small skillet over medium-high heat, stirring constantly until fragrant and light brown, about 3 minutes. Remove to a plate and set aside. 3. Quarter and core the apples, reserving the cores and seeds. Tie apple trimmings in cheesecloth (or a jelly bag, if you have one).
4. Put the peaches and sugar in a wide, 6- to 8-quart preserving pan or other wide, shallow pan. Bring to a simmer over medium-high heat, stirring frequently, and continue to cook until the juices just cover the peaches, about 5 minutes. Pour into a colander set over a large bowl. Stir peaches gently to drain off juice. Return juice to pan, along with the apples and the trimmings. Bring to a boil over high heat and cook, stirring occasionally, until syrup is thick and reduced, about 15 minutes.
5. Return peaches and any accumulated juices to pan. Add lemon juice, almonds
and lemon thyme. Bring back to simmer and cook, stirring frequently, about 15 minutes, until peaches are very tender and a small dab of jam spooned onto the chilled plate and returned to the freezer for a minute becomes somewhat firm. (It will not gel.) Remove from heat. Discard apples and trimmings, and stir gently to distribute fruit in the liquid.
6. Ladle hot jam into the jars, leaving 1/4-inch space at the top. Wipe jar rims. Put a flat lid and ring on each jar, and tighten until snug. Return the jars to the canning pot, making sure water covers jars by at least 1 inch. Bring to a boil and boil for 5 minutes. Remove from pot and let sit untouched for 12 hours. (After 1 hour, check to see if the jars have sealed. If the center of the lid can be pushed down, it hasn't sealed. Store any unsealed jars in the refrigerator.) Label and store, preferably in a cool, dark place.
-- Adapted from Liana Krissoff, "Canning for a New Generation" (Stewart, Tabori & Chang, $24.95, 304 pages)
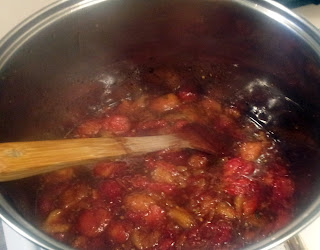
This jam is such a unusual variety of flavors that I would not even imagine they would come together they way they do. As I tasted it this evening while waiting to see if it would set, I told Edward that this jam reminds me of cold, wet, Autumn days. This jam will be so delicious just served on toast, a bit of butter, a cup of hot tea on the side. The perfect comfort food when summer is long gone and winter is fast approaching.
Just a note however, I did have to add one box of pectin to this as it just did not want to set at all. I like my jams and jellies not quite completely firm, just a tad bit runny and it wasn't until I added the extra pectin that it started setting.
September/October 2011
By Sherri Brooks Vinton
Corn adds color and flavor to this party favorite. Scoop up this home-canned corn salsa with tortilla chips or roll it up, burrito-style, with rice, beans and cheese for a quick meal.
Ingredients
12 ears corn, shucked
3 cups distilled white vinegar
1 cup sugar
1 tablespoon cumin, ground
1 tablespoon salt
5 pounds tomatoes, diced
1 to 2 jalapeño peppers, diced
1 green bell pepper, diced
1 large onion, diced
2 garlic cloves, minced
1/2 cup fresh cilantro, chopped
Prepare
1. Bring a large nonreactive stockpot of water to a boil. Add corn and boil for 5 minutes. Drain.
2. When corn is cool enough to handle, stand cobs on end and slice to cut off kernels, being careful not to cut into cobs. Empty and wipe out stockpot.
3. Combine vinegar, sugar, cumin and salt in the stockpot, and bring to a boil. Add tomatoes, jalapeños, bell pepper, onion, garlic and corn kernels, and return to a boil. Reduce heat and simmer for 5 minutes to allow flavors to blend. Stir in cilantro and return to a boil. Remove from heat.
Preserve
Use the boiling-water method. Ladle into clean, hot half-pint or pint canning jars, leaving 1/2 inch of headspace. Release trapped air by stirring contents with a plastic knife or wooden chopstick. Wipe rims clean; center lids on jars and screw on jar bands. Process in canner for 15 minutes. Turn off heat, remove canner lid and let jars rest in water for 5 minutes. Remove jars and set aside for 24 hours. Check seals, then store in a cool, dark place for up to 1 year. Makes about 8 pints.
I followed this recipe almost exactly and it seemed pretty tart and sweet to me. I'm waiting anxiously to try this in a month or two to see if the tartness dies down somewhat. It is a very pretty salsa though and I can imagine chicken cooked with this salsa will be pretty tasty. That's if the tartness/tangyness lessens.
I did learn one lesson today. Never would've guessed this one. I usually let the tomatoes drain a bit before heating them up so I always have extra tomato juice when canning tomatoes. In the past I've saved the juice and frozen it. This ends up taking up a lot of space in the freezer!
Today inspiration struck and I thought "what if I simply cook the tomato juice down a bit and see if I can thicken it a bit?".
Next thing you know, an hour later, I taste it and lo and behold, I have tomato soup. Think Campbells but a bit more flavorful as I had thrown in a piece of celery here, a bit of corn there, some stray basil leaves, a tad bit of onion.
So what did I do? I canned it. My first soup! I canned my first soup! How cool is that!?

Ingredients
- 4 cups cantaloupe peeled and chopped
- 4 cups peaches peeled and chopped
- 6 cups granulated sugar
- 1/4 cup lemon juice
- 1 teaspoon grated lemon rind
Combine cantaloupe and peaches in a Dutch oven. Cook over medium heat stirring constantly for 15 minutes. Add sugar and lemon juice stirring well then bring to boil stirring constantly. Reduce heat and simmer 30 minutes. Add lemon rind and cook 3 additional minutes stirring constantly. Remove from heat then skim off foam. Pour hot jam into hot sterilized jars filling to 1/4" from top. Remove air bubbles then wipe jar rims. Cover at once with metal lids and screw on bands then process in boiling water bath 5 minutes.
Where the Peach, thyme and toasted almond jam reminds me of Autumn this jam is quintessentially summer. With every spoonful, a reminder of the flavors of summer are present. The tart and tangy peaches, the muted cantaloupe sweetness. It just tastes of Sun, warm days and summertime.
Just a side note, I had what I thought was a time saving idea and used my crock pot to slowly cook down the peaches and cantaloupe. Only issue with this is the sugar in the peaches and cantaloupe caramelized some and turned it from the bright orange and peach color to a brownish color. While it still tastes wonderful, the color is a disappointment.
TIP! This really has nothing to do with canning but I felt I had to add this. If you ever buy true cultured buttermilk to make Creme Fraiche remember, you can also use this buttermilk to make fresh buttermilk cheese. This stuff is delicious and would rival grocery store cheese!
Here's the recipe:Where the Peach, thyme and toasted almond jam reminds me of Autumn this jam is quintessentially summer. With every spoonful, a reminder of the flavors of summer are present. The tart and tangy peaches, the muted cantaloupe sweetness. It just tastes of Sun, warm days and summertime.
Just a side note, I had what I thought was a time saving idea and used my crock pot to slowly cook down the peaches and cantaloupe. Only issue with this is the sugar in the peaches and cantaloupe caramelized some and turned it from the bright orange and peach color to a brownish color. While it still tastes wonderful, the color is a disappointment.
 |
| Left to right: Peach & Cantaloupe Jam, Peach Thyme & almond jam, tomato soup up front, hot pepper jelly behind. Corn Tomato Salsa, Tomato basil jam, Lacto Fermented spicy lemon cucumbers. |
TIP! This really has nothing to do with canning but I felt I had to add this. If you ever buy true cultured buttermilk to make Creme Fraiche remember, you can also use this buttermilk to make fresh buttermilk cheese. This stuff is delicious and would rival grocery store cheese!
1 quart whole milk
1 1/2 cup buttermilk
1 to 2 teaspoons sea salt
Cheesecloth
Colander
Heat up the milk, the buttermilk and the sea salt until around 180 to 210 degrees. Make sure to GENTLY heat this as you do not want the milk to scald on the bottom of the pan.
I stir it in the beginning to make sure the buttermilk and salt is fully incorporated and then I leave it alone.
This is the best advice I can give when making buttermilk cheese. Really, leave it alone. Do not stir it. Just turn it on, make sure it's not getting too hot too quick and then walk away and go fold laundry or something else.
Come back shortly thereafter and VOILA! Your curds and whey will now have seperated. Turn off heat and allow it to cool a bit. Around 10 minutes or so.
Now slowly empty pot of whey and curds into the cheesecloth that you have placed into the colander.
At this point I just let the whey drip out for about 10 minutes. After this freely dripped for a while, I gathered up the cheese cloth and tightened the top a bit and began to exert some pressure on the curds.
This accomplishes two things. You drain more whey out and you force the curds to form together.
Now here's where the real fun begins!
You can add whatever spices you feel like adding! My most recent batch was Lemon Pepper using a plain old lemon pepper sea salt mixturre and the other one I flavored with garlic salt.
The possibilities are truly endless!
Recently Edward and I made enchiladas and I used the garlic flavored cheese as part of the filling. Oh my was it delicious!
Comments
Post a Comment